


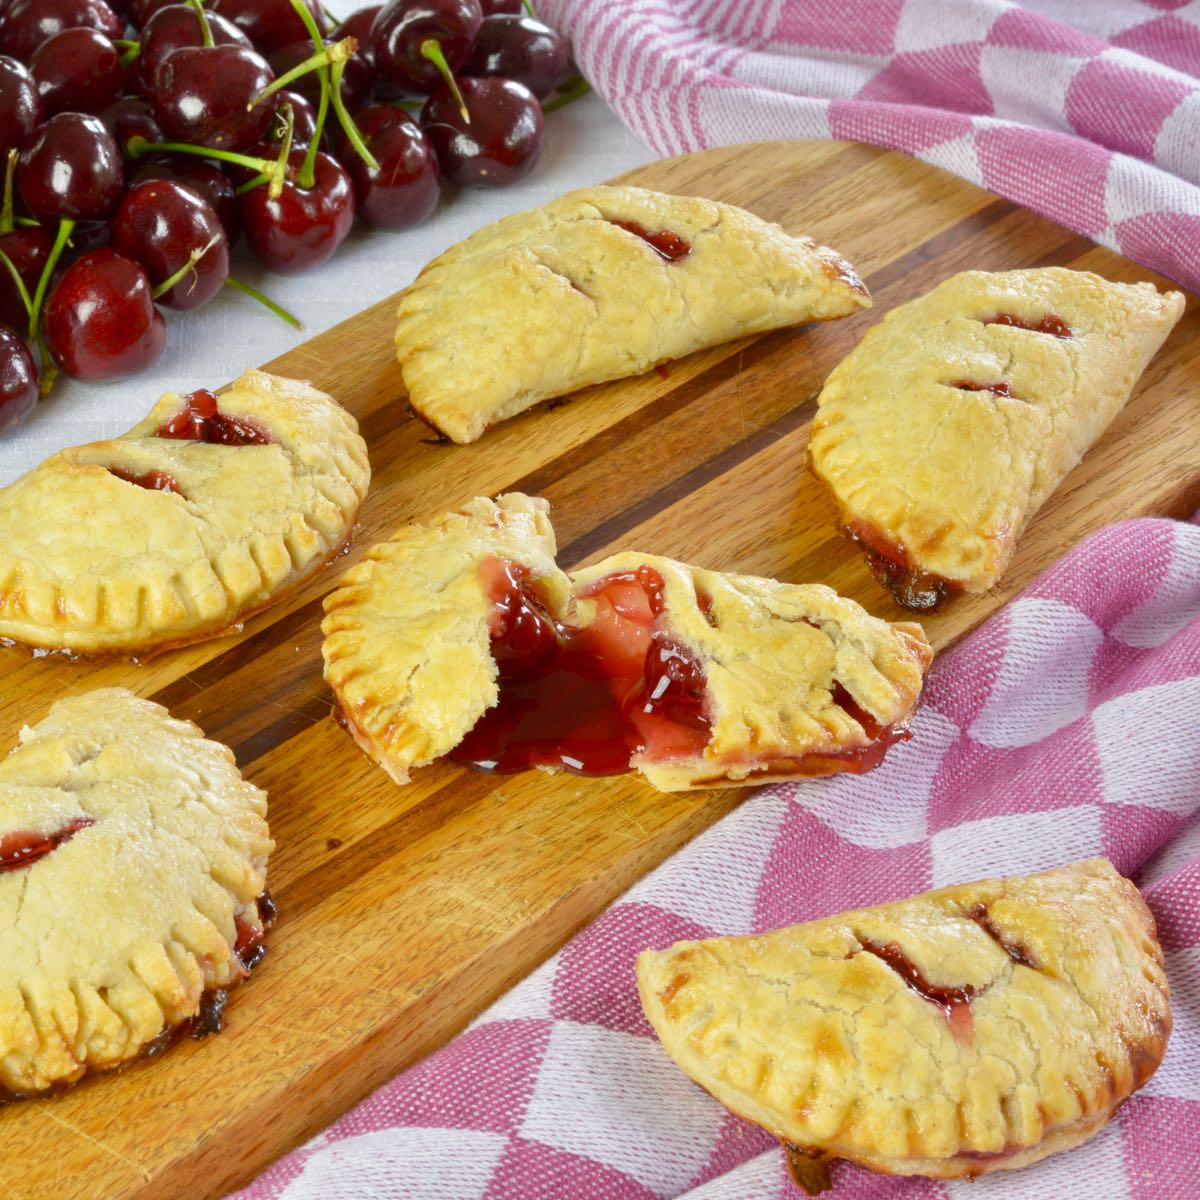
Pastry lovers have got to try these gluten free Cherry Hand Pies. They're flaky, buttery and easier to make than a whole pie. You can fill them with any store bought or homemade pie filling or meat filling and you can even freeze them.
When I teach my pastry class we make these cute little hand pies, instead of a big pie, for a two reasons. It's easier to master the technique with a smaller piece of dough, and we can make them from start to finish, and taste them, in under two hours.
Jump to:
🥧 Ingredients
This is a pastry recipe that you can wrap around a savoury meat filling or fill with any store bought or homemade filling.
- butter and sour cream - using all butter with sour cream creates a workable dough
- rice vinegar - makes tender pastry (better than baking soda or lemon juice)
- EGFG gluten free flour blend (sweet rice flour, potato starch, sorghum flour, millet flour)
- sugar
- xanthan gum - important for structure
- sweet rice flour for sprinkling - as little as possible please.
- Filling: store bought or homemade sweet or savoury pie filling
See recipe card for exact amounts.
📹 Instructions for Gluten Free Pastry
Forget some techniques you think you know. If your mom wasn't baking gluten free she is not the best source for success with gluten free pastry.
- Rest time - Let the dough rest for 30 minutes to allow gluten free flours to absorb the liquid.
- Minimize sprinkling flour - Dust pastry lightly with sweet rice flour at any step in the process. My students find it's easiest to minimize sprinkling flour if they use wax paper or clear plastic on both sides of the dough when rolling it out. (Oops, I didn't show that in the video.)
- Use the fridge - Pastry is easiest to handle when cold so keep the dough you aren’t working with in the fridge. Anytime the dough is too soft to work with put it back in the fridge for 10-15 minutes.
- Organize for success - Get the tools that work best for you and organize them so making pastry is easy. Consider flexible cutting mats, placemats, plastic wrap and wax paper to help move dough in and out of the fridge as well as flipping the dough without breaking it.
Video Instructions

🫙 Substitutions
EGFG Gluten Free Flour - This recipe works with my EGFG Flour Blend. If for any reason you cannot use this blend here is what I learned in the process of finding what for me, is my favourite everyday blend.
It's possible to find a flour blend that meets your dietary restrictions and works in many recipes. Look at this post, 11 Gluten Free Flour Recipes, start baking and take notes.
Xanthan gum - The best substitute for xanthan is guar gum. Use it in equal amounts in any recipe calling for xanthan gum.
👋🏻 Variations
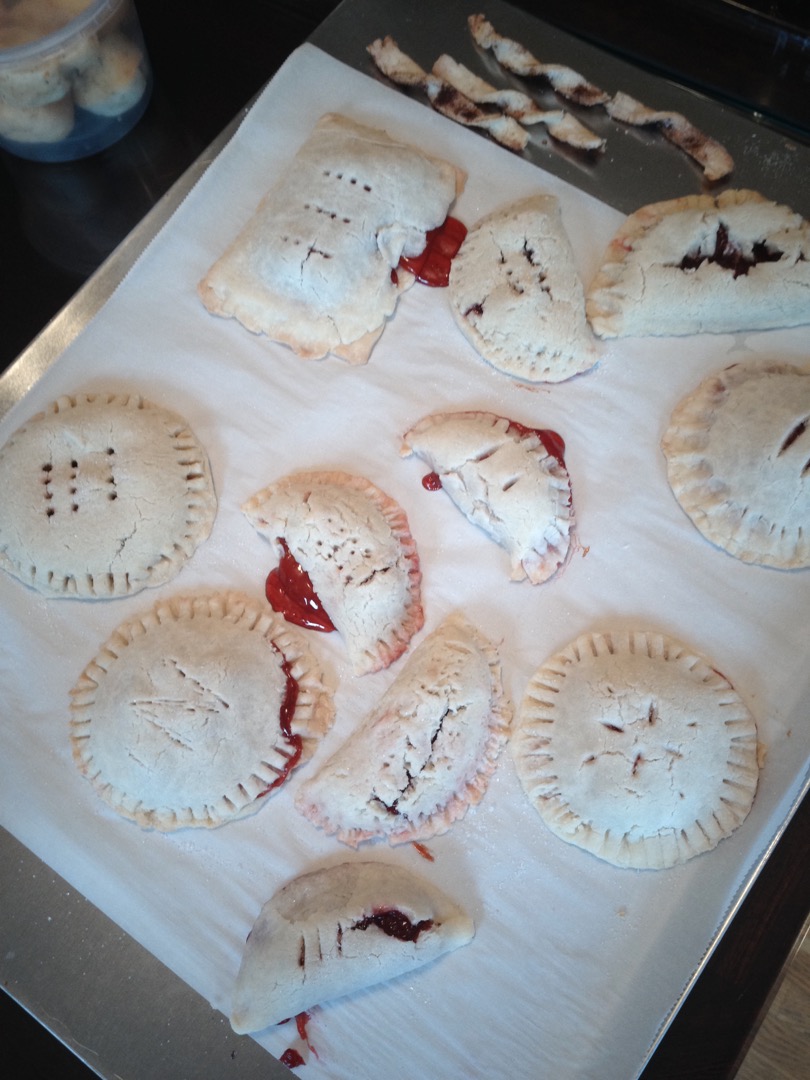
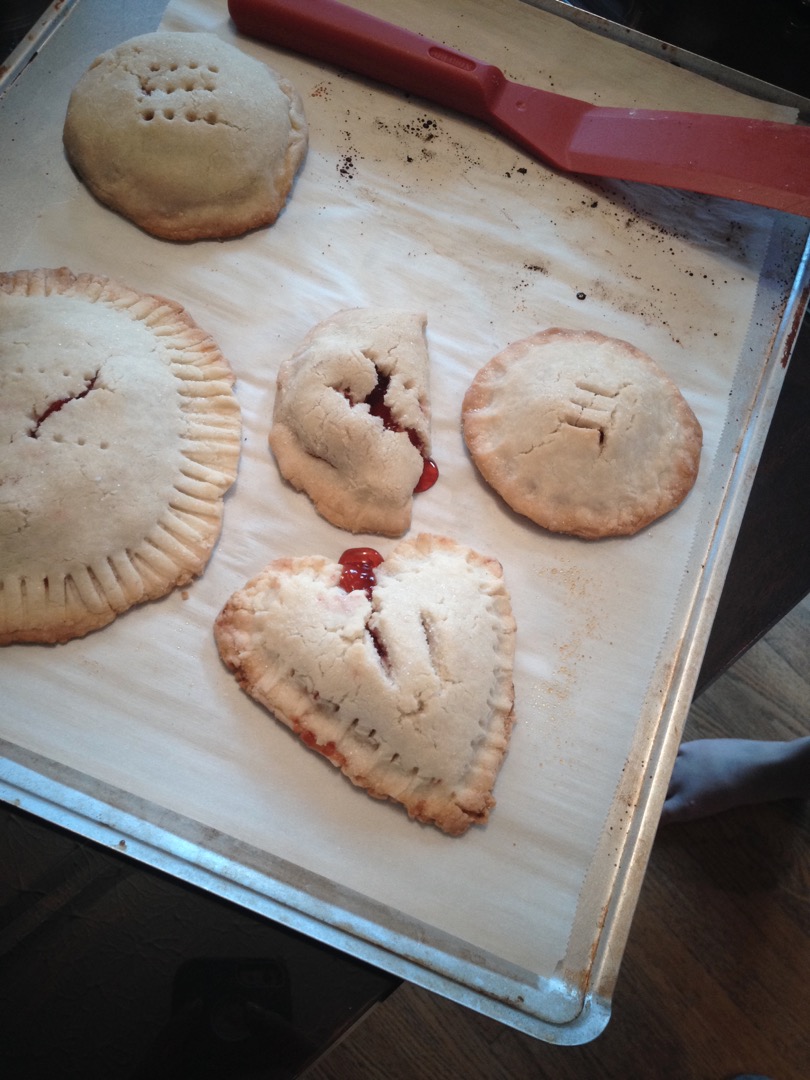
In my cooking classes we make full circles and half-moon shapes with a 4-inch round cookie cutter. Participants have fun making all kinds of shapes from hearts to Pop Tarts, and even scary Halloween faces.
Get The Tools
You don’t need a lot of tools to make pastry but over time cooks like to collect their favourites. Here are some possibilities.
- Stand mixer or Food Processor - I make pie dough in my food processor because it's fast and easy. It can be made by hand using a simple pastry cutter. My mom, an expert pie maker, always made hers in a basic Sunbeam mixmaster so just use what you have. The modern equivalent would be a Kitchen Aid stand mixer.
- A drinking glass or wine bottle with straight sides works pretty good but rolling pins were made for pastry. I have a heavy marble rolling pin with stand, favoured by bakers for both its' weight and cool temperature. Of course there is the standard wooden rolling pin, a silicone rolling pin, an adjustable rolling pin, the classic tapered French rolling pin and even stainless steel ones. I think I need another rolling pin.
- Gluten free cooks should be equipped with great resources and I recommend any of these three books. The third book is a compilation of the first two. The How Can It Be Gluten Free Cookbook, Volume 2 The How Can It Be Gluten Free Cookbook and How Can It Be Gluten Free Collection; 350+ Groundbreaking Recipes For All Your Favourites.
🥶 Storage
I freeze my hand pies if they aren't going to be eaten with three days. Pastry thaws fairly quickly so there is no need to microwave them. If you want to enjoy warm hand pies use the power setting on your microwave, I use half power.
I don't freeze the whole recipe of dough but I sell freshly made pie dough and cookie dough in Calgary once a month. Many people tell me they freeze the whole recipe, thaw it overnight and make all their pastry recipes when they have time.
Top Tip for Best Flour for Pastry Recipes
With some effort you can find a flour blend that works for all your dietary needs and preferences. For more on the topic join my cooking class 'Understanding Gluten Free Flour', or read and watch this 12-part series on flour that starts with How To Use Rice Flour. If you subscribe to my community you'll get my best resources sent straight to your inbox over several days.
Gluten Free Hand Pies
Ingredients
PASTRY
- 6 tablespoon cold water
- 3 tablespoon sour cream I use 14% for the best flavour
- 1 tablespoon rice vinegar
- 390 grams EGFG gluten free flour blend* (2¾ cups plus 2 Tbsp)
- 1 tablespoon sugar
- ½ teaspoon salt
- ½ teaspoon xanthan gum
- 1 cup butter cut into small pieces and freeze for 15 minutes before making pastry
EGG WASH
- 1 egg
- 1 tablespoon milk
FILLING
- ½ can gluten free pie filling (18 oz/540 ml) or meat filling
SPRINKLING FLOUR - sweet rice flour
Instructions
- Measure and cut butter, place in freezer for 15 minutes.
- In 1-cup measuring cup combine water, sour cream and vinegar. Set aside.
- Combine flour, sugar, salt and xanthan gum in food processor with dough blade. Process for 5-10 seconds.
- Add butter on top and process until combined into uniform crumb-like mixture.
- Pour sour cream mixture onto flour, pulse until well combined and looks like pastry.
- Turn dough onto a large piece of wax paper and divide into 2 pieces. Shape each piece into a round disk and wrap in wax paper. Refrigerate for at least 20 minutes until cold enough to work with. Can be prepared in advance, wrapped well in plastic and stored in the fridge for several days.
EGG WASH
- Mix egg and milk. Set aside.
ROLL OUT PASTRY
- Working with 1 piece of dough at a time, remove from fridge and let sit until pliable.
- Leaving the disk in the center of the wax paper, sprinkle both sides lightly with flour.
- Using a rolling pin start in the center and roll out toward the edge. Lift and repeat always starting in the center, turning the dough as you go. Roll out to ⅛-inch thickness.
SHAPING HAND PIES
- Cut dough into 3½-inch or 4-inch circles. (see notes)
- Drop a small amount of cherry pie filling in the center of a circle. Gently fold over pinching the edges together. Using a fork, dipped in flour, gently press the edges to seal. Make air vents in the top of each pie.
- Brush each hand pie with egg wash and sprinkle with sugar.
- Bake in 400°F oven for 20-25 minutes or until golden brown. Cool on baking racks.
Notes
Nutrition
__________________________________________________________________________
New here? Overwhelmed or frustrated with gluten free? Learn a little bit about gluten free flour with this guide and start cooking GF food everyone wants to eat.
🎉 Exciting news! Adventures in a Gluten Free Kitchen, is a low cost way to learn to cook with help and encouragement from everyday cooks who get it.
_________________________________________________________________________
Leave a Reply