Vegetable Stacks are simply a fun and gourmet way to serve vegetables. They're fairly easy to assemble, look impressive with a stem of fresh rosemary, and go over the top with a simple swirl of balsamic glaze. When you cook with vegetables it's all gluten free.
These vegetable stacks are a perfect make-in-advance side dish to serve at a casual barbecue or a fancy dinner any time of year. From my Southwestern summer menu to an Italian themed Dinner Club night, these stacks work almost anywhere. If you're working toward 30 plants a week, this recipe could use six or eight plants.
Jump to:
Ingredients
This recipe is a guide. Choose vegetables in season or any combination that goes with your menu. Vary the seasoning or keep it simple with olive oil, salt and pepper. Plan to serve the stacks slightly warmer than room temperature, not screaming hot, for the flavours to shine through.
- Portobello mushrooms
- Zucchini
- Red & yellow pepper - Go for some colour.
- Tomato
- Goat cheese makes the stack a little slippery but the taste...
- Potatoes
- Eggplant
- Rosemary sprigs
- Balsamic glaze
See recipe card for exact amounts.
Instructions: Roasted vs Grilling Vegetables
Roasted vegetables are pretty everyday so for this recipe it’s all about the presentation. Pay attention to make similar sized pieces for a nice looking stack.
Buy vegetables for their size and think about how you will cut them. I bought two eggplants knowing I would only use the top portion of each for small rounds. I chose zucchini, tomatoes and potatoes about the same size. After roasting the peppers I cut them to fit the stacks.
And then for the pièce de résistance add a swirl, the kind you would see on a restaurant plate. It is easy to make using balsamic glaze and it finishes off the plate.
Substitutions & Variations
Roasting vs Grilling: In the summer I make many versions of these vegetable stacks including one with grilled vegetables. I used a balsamic marinade and made
Garnish: Make the swirls with anything that has enough body to be drawn onto a plate. I love using chipotle mayo to go with a Southwestern dinner. If you want to try something wild and crazy, do a quick Google search of images to get your creative juices flowing.
Rosemary: While the rosemary screams farm-to-table a wooden skewer can be used and your guests will not have seen this photo so they will not consider it a substitute.
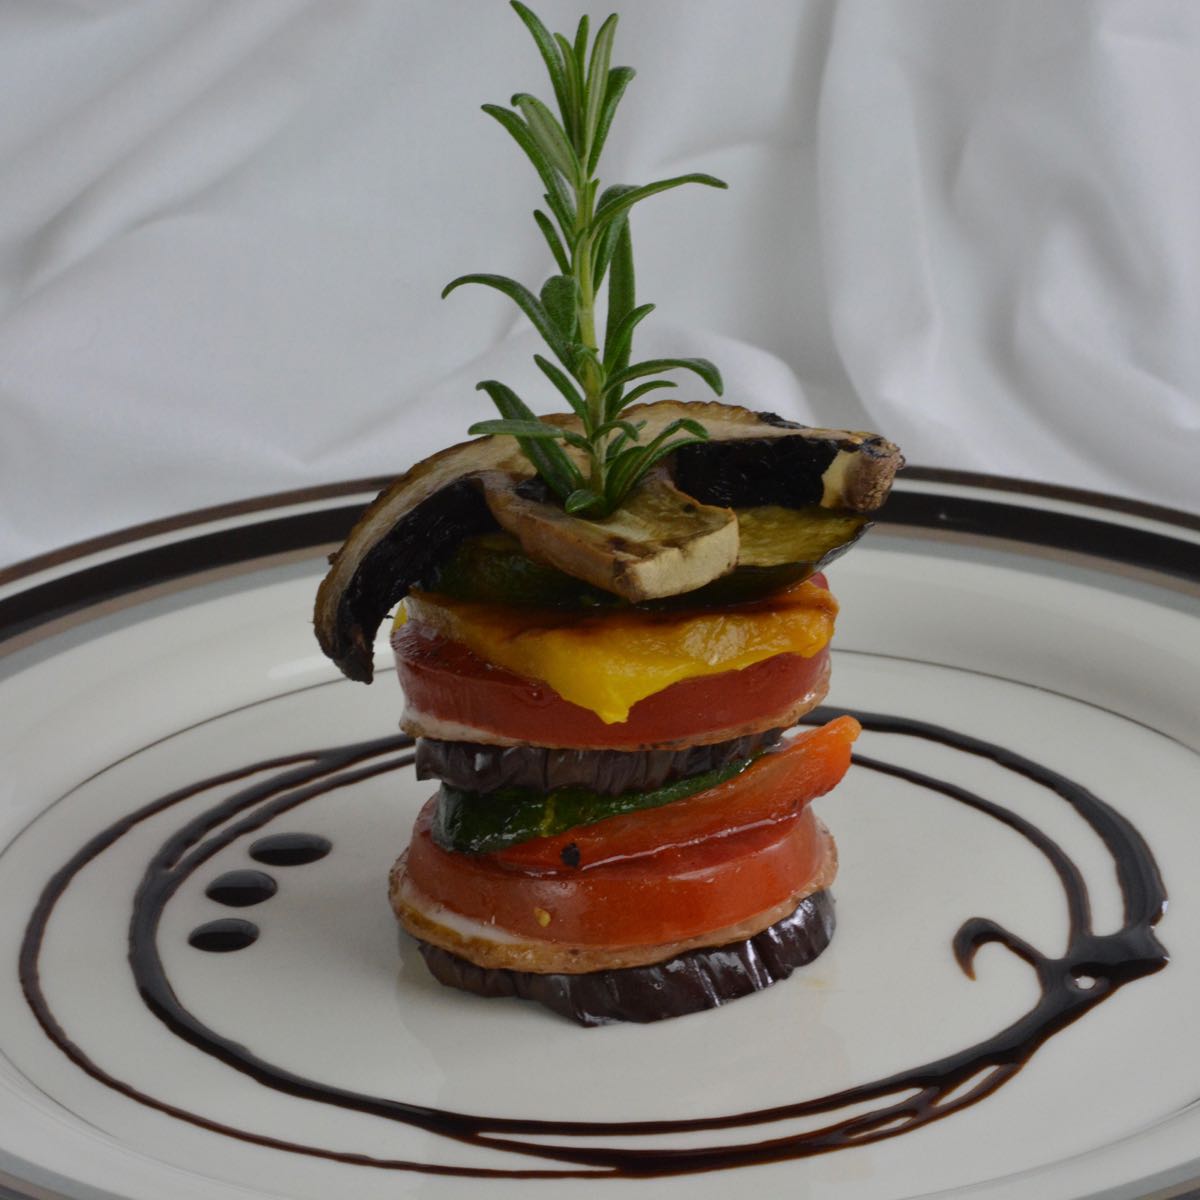
Vegetable Stacks
Ingredients
Listed in order of stacking from the top down:
- 1-2 portobello mushrooms
- 1-2 zucchini
- 1 red pepper
- 1 yellow pepper
- 1-2 tomatoes
- 2 oz goat cheese* optional
- 2 potatoes
- 1-2 eggplant
- olive oil for brushing vegetables
- salt and pepper
GARNISH
- rosemary sprigs
- balsamic glaze
Instructions
- Preheat oven to 425°F. Line 2 baking sheets with parchment.
- Blacken peppers on all sides over a gas flame or under the broiler. Place in plastic bag to steam for 10 minutes. Remove from bag and peel off as much skin as possible. Seed and cut into desired size.
- Cut and prep vegetables to desired thickness using a mandolin, food processor or steady hands.
- Spread vegetable slices on baking sheet and brush both sides with oil, salt and pepper. Bake as follows:
- Portobello mushroom, about 5 slices per mushroom, 3 minutes per side
- zucchini cut into 7 mm slices, 6 minutes per side
- eggplant cut into 7 mm slices, 6 minutes per side
- potato cut into 3.5 mm slices, 10 minutes per side
- Baking times will vary depending on the thickness of each vegetable.
- As vegetables come out of the oven place on a tray in groups for quick assembly. Can be prepared several hours in advance.
- Assemble vegetable stacks on a cutting board or baking sheet as follows:
- Place eggplant slice on a plate. Top with potato slice.
- Spread ½ tablespoon goat cheese on each potato slice.
- Top with tomato, roasted pepper and zucchini.
- Finish with 1 portobello mushroom slice.
- Cut long pieces of fresh rosemary. Pull leaves off bottom half of each piece and poke through the entire vegetable stack. Alternately use a long bamboo pick.
SERVING
- Make 2-3 swirls around the outside of an empty dinner plate using balsamic glaze.
- Place 1 or 2 vegetable stacks in the center of the balsamic circle.
- Serve slightly warmer than room temperature.
Notes
Nutrition
__________________________________________________________________________
New here? I've got help to get you from overwhelmed and frustrated to confidently cooking gluten free food the whole family wants to eat. Subscribe and get your free resource, 29 Tips for GF flour.
🎉 I made it into the Top 100 Gluten Free Blogs for 2025 and the Top 40 Gourmet Food Blogs. To learn all the ways I can help you click here, Everyday Gluten Free Gourmet.
_________________________________________________________________________







Leave a Reply