


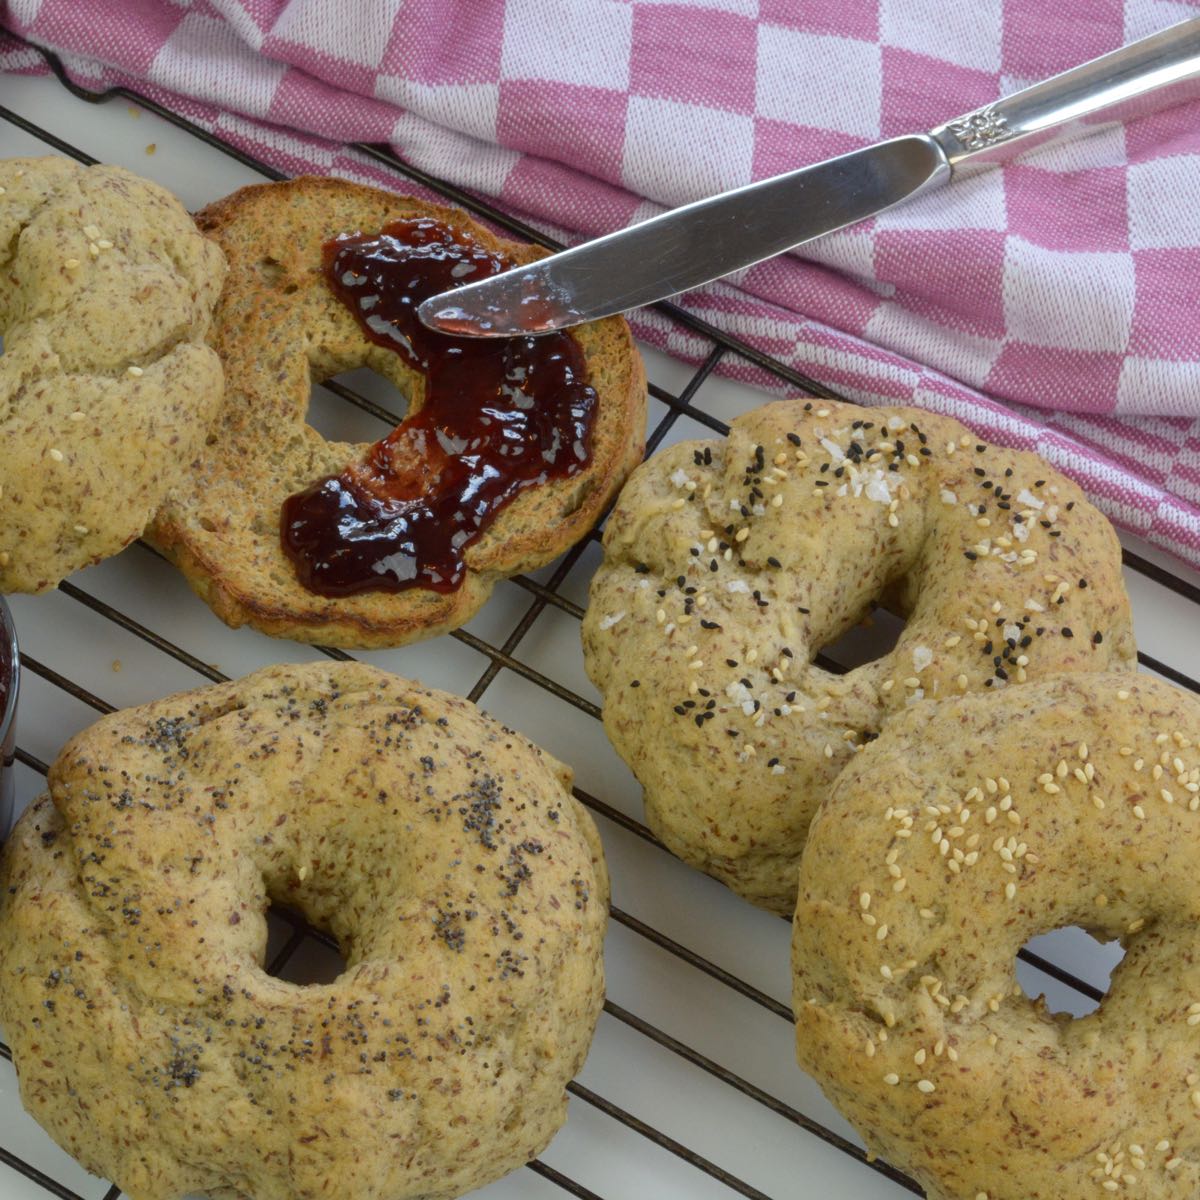
You can make gluten-free dairy-free bagels with very little baking experience. I'm always up for a challenge in the kitchen so when asked for a bagel recipe I tested, tweaked and this is it. One thing I've learned is that individually weighed flours give the best results with yeast breads. I quit trying yeast bread recipe that call for an all-purpose gluten free flour blend, they're always disappointing.
I never was much of a bread maker but once you cook gluten free it's inevitable that you'll want at least a handful of bread recipes. I started with Brazilian Cheese Buns, buttermilk biscuits and cheese biscuits because they don't use yeast.
Eventually people asked for yeast breads and I made this crusty Artisan loaf, soft pull-apart dinner rolls and pizza dough. If I can make these things I know that you can too.
🥯 Ingredients
When it comes to gluten free yeast breads I pass over recipes that call for an all-purpose gluten free flour. Those blends work in muffins, pancakes and quick breads but they never give the best results with yeast breads.
- brown rice flour
- potato starch
- tapioca starch
- sorghum flour
- ground flax seed (contributes to a wheaty taste)
- active dry yeast
- xanthan gum (many yeast breads use psyllium husk powder as the binder but some use xanthan gum)
- corn syrup
- cooking oil
- apple cider vinegar (helps with the rise)
- molasses (contributes to a darker colour and firm exterior)
- Toppings: sesame seeds, poppy seeds, chia seeds, onion seeds and/or sea salt flakes
See recipe card for exact amounts.
Confidence with Gluten Free Yeast Bread
Now there are a few things to know about gluten free yeast breads but it's not rocket science. Be aware of these differences, measure precisely and you're likely to get better each time you make the recipe.
- The structure of yeast breads is not as strong without gluten so they do not get punched down and there is no second rise.
- Some recipes will look more like a batter to start. (See the steps in my pizza dough.) Be patient, you can almost see the flour slowly absorbing the liquid and the batter turning into a dough.
- Depending on the recipe you can use some additional flour for shaping the dough. Sweet rice flour, tapioca starch and millet flour are common choices. I didn't need a sprinkling flour to shape these bagels.
- In some recipes adding too much additional flour will effect the dough since there is no time for it to absorb liquid. Every recipe and every dough is slightly different.
Yeast breads won't be intimidating if you just try them once in awhile. You'll become more confident with the process each time you bake. Making the same recipe a few times, at least three, is the best way to build confidence.
Active Dry Yeast vs Instant Yeast
Yeast leavens bread and creates a light texture. It is often activated in liquid but some recipes simply mix it in with the dry ingredients. It is then activated when the dry and liquid ingredients are mixed together.
Yeast does expire and lose its' ability to activate so it should be stored in the fridge. If you bought yeast during the pandemic check the expiry date and don't use it if it has past.
Buying yeast is not as straight forward as it once was. The two common types are active dry and instant. They both produce very similar results but there are differences.
| Active Dry Yeast | Instant, Quick Rise, Rapid Rise or Bread Machine Yeast |
|---|---|
| -coarse, oblong granules -is dissolved in sugar water -slower rise time -Fleischmann's yeast, the yellow packages labelled Traditional Active Dry Yeast | -small round granules -does not need to be dissolved -shorter rise time -Fleischmann's yeast, the yellow packages labelled Quick Rise - Instant Yeast |
Tip For Helping Dough Rise
As yeast activates it creates bubbles of carbon dioxide that help the dough rise. Ideally dough should be placed to rise in a draft free location. This can be on top of the fridge or in a corner away from a door.
If your kitchen is cold or drafty you can let dough rise in a slightly warmed oven. Turn it to 200°F for a few minutes but don't let it get that hot. The oven will then be a draft free place for your bagels to rise.
Why Boil Bagels Before Baking
If your bagels aren't boiled they aren't bagels. Boiling bagels before baking sets the crust to create a proper chewy bagel. The gluten free trick is to add molasses or baking soda to the water to help with this process. Don't skip this step.
Get The Tools
I use my Kitchen Aid to mix dough but you can do it by hand. Any baking sheet will do but buy them in pairs. Rather than adjusting the oven temperature, double up the baking pan if your baking browns on the bottom too quickly.
I also have an instant read thermometer to check the water temperature for activating yeast. As long as it hasn't past the expiry date it doesn't really need to be dissolved in water but there are many more uses for that thermometer so I think you should have one.
There's nothing like eating freshly baked bagels (bread, buns, cookies etc.). With each attempt you gain the confidence to bake again. With each success you gain more confidence to tweak a recipe if needed. Remember:
"If someones making it, someones making it gluten free."
That someone could be you! Whatever food you're missing you can make it.
__________________________________________________________________________
New here? Overwhelmed or frustrated with gluten free? Learn a little bit about gluten free flour with this guide and start cooking GF food everyone wants to eat.
🎉 Exciting news! Adventures in a Gluten Free Kitchen, is a low cost way to learn to cook with help and encouragement from everyday cooks who get it.
_________________________________________________________________________
Gluten-Free Dairy-Free Bagels
Equipment
Ingredients
DRY INGREDIENTS
- 145 grams brown rice flour 1 cup
- 82 grams potato starch ½ cup
- 69 grams tapioca starch ½ cup
- 60 grams sorghum flour ½ cup
- 82 grams ground flax seed ½ cup
- 1 tablespoon active dry yeast
- 1 tablespoon xanthan gum
- 1½ teaspoon salt
WET INGREDIENTS
- 1¼ cups warm water
- 2 tablespoon corn syrup
- 2 tablespoon cooking oil
- 1 teaspoon apple cider vinegar
BOILING
- 1 tablespoon molasses
SHAPING & TOPPING
- Cooking oil for your hands
- sesame seeds, poppy seeds, chia seeds, onion seeds and/or sea salt flakes
Instructions
- Line baking sheet with parchment.
- Combine all dry ingredients in large bowl of a stand mixer. Mix to combine evenly.
- In a large pyrex measuring cup whisk wet ingredients to combine.
- Turn stand mixer to low and mix dry ingredients for 30 seconds. With mixer on slowly add wet ingredients. When combined increase speed to medium and mix for 3 minutes. The dough will be quite sticky. Using a spatula push the dough down and mark it into 4 or 5 equal portions.
- Grease your hands with vegetable oil to shape the bagels. Using your hands remove a portion of dough and roll into a smooth rope or shape into a smooth ball. Use your thumb make a hole in the centre. It can be quite large as it will get smaller when the dough rises.
- Place bagels on baking sheet and put in warm oven. Let rise for about 40 minutes. They should be visibly puffed up.
- While bagels are rising bring a large pot of water to a boil. Add molasses and stir.
- Prepare sprinkles and set aside.
- When bagels are ready remove from warm oven. Preheat oven to 400°F.
- One at a time, gently slip bagel into boiling water. Cook for 30 seconds per side then remove to wire rack using a slotted spoon.
- Place boiled bagels back on baking sheet and generously sprinkle with desired toppings.
- Bake in preheated oven for 25-28 minutes or until golden brown. Cool on a wire rack for 10 minutes before eating.

Steshni Corea
Awesome breakfast
Wendy
Can I substitute the corn syrup with honey
Cinde Little
Yes Wendy, you can use honey in this recipe. I don't normally have corn syrup in the house but the request was for a GF and vegan bagel. Happy baking!